
TerraformでOCI上にリソースを作ってみた
こんにちは。Oracle Cloud Infrastructure(OCI)特集 編集部です。
今回はterraformを使ってGUIでOCIにログインしないで、いくつかのリソースを構築してみました。以下は過去の記事になります。
TerraformでOCI上に仮想サーバを建ててみた
1.前提
本作業の前提条件は下記の通りとします。
・端末へterraformをインストールし、init済みであること
・使用するOCIユーザー、グループ、コンパートメントを作成済みであること
2.構築内容
今回terraformを使って以下のリソースを構築します。
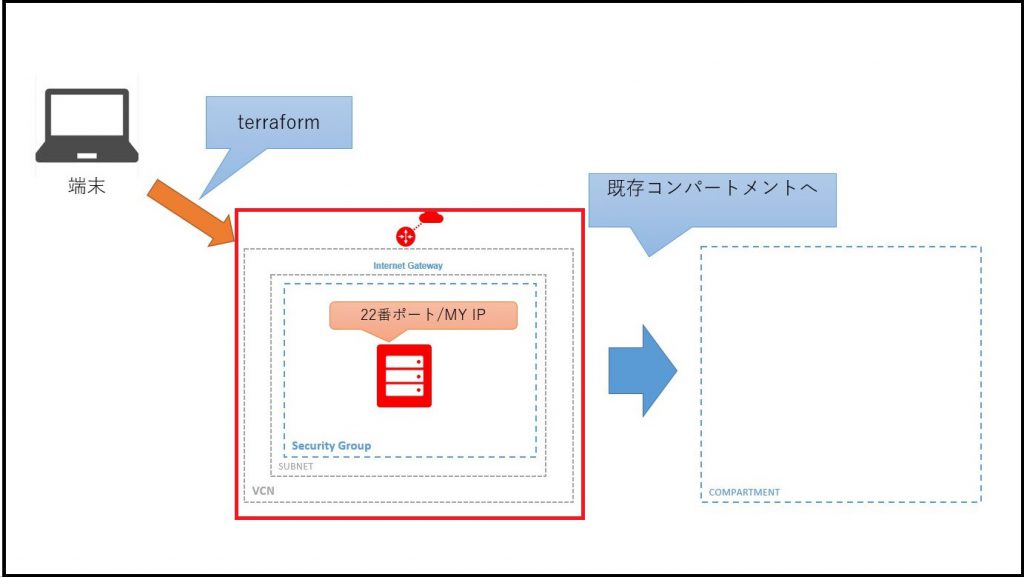
作成したコンパートメント内の東京リージョンに
・VCN
・Subnet
・Internet gateway
・Route Table
・Security List
・Compute
を作成していきます。
3.作成するtfファイル
terraformは同じディレクトリ内の.tfファイルをすべて読み取り、実行してくれます。
なのでファイルを細かく分けたり、1つのファイルにすべて書くこともできます。
今回は以下のtfファイルを書きました。

大きく分けて以下2つのtfファイルがあります。
1.main.tf
2.variables.tf
main.tfファイル(compute.tfファイルなど)は、リソース定義用ファイルです。
variables.tfファイルは、環境変数定義用ファイルです。
4.common.tfファイルの作成
様々なリソースで定義が必要なものはcommon.tfファイルで定義しておきます。今回はコンパートメントIDのみですが用途に応じて増やします。以下はcommon.tfファイルの中身です。
variable "compartment_ocid" {
  default = "XXXX"
}
5.provider.tf、provider-var.tfファイル作成
terrformの公式にprovider情報が定義されてあるのでそれをコピーし、メモ帳などに貼り付けます。https://www.terraform.io/docs/providers/oci/index.html
以下はprovider.tfの中身です。
provider "oci" {
  tenancy_ocid = "${var.tenancy_ocid}"
  user_ocid = "${var.user_ocid}"
  fingerprint = "${var.fingerprint}"
  private_key_path = "${var.private_key_path}"
  region = "${var.region}"
}
${ }の部分に直接値を代入しても利用できるのですが、その場合、terraformを利用するときに毎回いくつものファイルの値を変更しなくてはなりません。なので別のtfファイルに変数をまとめてあげればそのファイルのみ書き換えるだけでいいので、他のファイルはそのまま利用することができます。
次に、上記のファイルに代入する変数のprovider-var.tfファイルを作成します。
variable "tenancy_ocid" {
  default = "XXXX"
}
variable "user_ocid" {
  default = "XXXX"
}
variable "fingerprint" {
  default = "XXXX"
}
variable "private_key_path" {
  default = "XXXX"
}
variable "region" {
  default = "XXXX"
}
”XXXX”に入る情報はコンソールにログインして取得する必要があります。取得方法については前回のブログを参照してください。
6.network.tf、network-var.tfファイル作成
次にcomputeのためのVCN,Subnet,Internet gateway,Route Table,Security Listを作成します。
以下は変数を代入するためのnetwork.tfファイルの内容です。
# VCN
resource "oci_core_vcn" "test_vcn" {
    cidr_block = "${var.vcn_cidr_block}"
    compartment_id = "${var.compartment_ocid}"
    display_name = "${var.vcn_display_name}"
    dns_label = "${var.vcn_dns_label}"
}

# Internet Gateway
resource "oci_core_internet_gateway" "test_internet_gateway" {
    compartment_id = "${var.compartment_ocid}"
    vcn_id = "${oci_core_vcn.test_vcn.id}"
    display_name = "${var.internet_gateway_display_name}"
    enabled = true
}

# route table
resource "oci_core_route_table" "test_route_table" {
    compartment_id = "${var.compartment_ocid}"
    route_rules {
        network_entity_id = "${oci_core_internet_gateway.test_internet_gateway.id}"
        destination = "0.0.0.0/0"
    }
    vcn_id = "${oci_core_vcn.test_vcn.id}"
    display_name = "${var.route_table_display_name}"
}


# Security List(Web-Subnet)
resource "oci_core_security_list" "test_security_list_web" {
    compartment_id = "${var.compartment_ocid}"
    egress_security_rules {
        destination = "${var.sl_egress_destination_web}"
        protocol = "${var.sl_egress_protocol_web}"
        stateless = false
        }
    ingress_security_rules {
        source = "${var.sl_ingress_source_web}"
        protocol = "${var.sl_ingress_protocol_web}"
        stateless = false
        tcp_options {
            max = "${var.sl_ingress_tcp_dest_port_max_web}"
            min = "${var.sl_ingress_tcp_dest_port_min_web}"
        }
    }
    vcn_id = "${oci_core_vcn.test_vcn.id}"
    display_name = "${var.sl_display_name_web}"
}

# Subent(web)
resource "oci_core_subnet" "test_web_subnet" {
    availability_domain = "DXeC:AP-TOKYO-1-AD-1"
    cidr_block = "${var.web_subnet_cidr_block}"
    compartment_id = "${var.compartment_ocid}"
    security_list_ids = ["${oci_core_security_list.test_security_list_web.id}"]
    vcn_id = "${oci_core_vcn.test_vcn.id}"

    display_name = "${var.web_subnet_display_name}"
    dns_label = "${var.web_subnet_dns_label}"
    prohibit_public_ip_on_vnic = "${var.web_subnet_prohibit_public_ip_on_vnic}"
    route_table_id = "${oci_core_route_table.test_route_table.id}"
}
providerファイルと同じように変数を代入するnetwork-var.tfファイルを作成します。
# VCN
variable "vcn_cidr_block" {
  default = "XXXX"
}
variable "vcn_display_name" {
  default = "techvan-VCN"
}
variable "vcn_dns_label" {
  default = "techvanVCN"
}

# internet gateway
variable "internet_gateway_display_name"  {
  default = "techvanIGW"
}

# route table
variable "route_table_display_name" {
  default = "techvan_RT_Web"
}

# security list web
variable "sl_egress_destination_web" {
  default = "XXXX"
}
variable "sl_egress_protocol_web" {
  default = "X"
}
variable "sl_ingress_source_web" {
  default = "XXXX"
}
variable "sl_ingress_protocol_web" {
  default = "X"
}
variable "sl_ingress_tcp_dest_port_max_web" {
  default = "XXXX"
}
variable "sl_ingress_tcp_dest_port_min_web" {
  default = "XXXX"
}
variable "sl_display_name_web" {
  default = "techvan_SL_Web"
}
# subnet web
variable "web_subnet_cidr_block" {
  default = "XXXX"
}
variable "web_subnet_display_name" {
  default = "XXXX"
}
variable "web_subnet_dns_label" {
  default = "techvan"
}
variable "web_subnet_prohibit_public_ip_on_vnic" {
  default = "false"
}
“XXXX”には適宜情報を入力していきます。
7.compute.tf、compute-var.tfファイルの作成
最後にcomputeのファイルを作成していきます。
networkのファイルと同じようにcompute.tfファイルを作成していきます。
resource "oci_core_instance" "test_instance" {
    count = "${var.NumInstances}"
    availability_domain = "${oci_core_subnet.test_web_subnet.availability_domain}"
    compartment_id = "${var.compartment_ocid}"
    shape = "${var.instance_shape}"
    display_name = "${var.instance_display_name}"
    create_vnic_details {
        subnet_id = "${oci_core_subnet.test_web_subnet.id}"
    }
    source_details {
        source_id = "${var.instance_image_ocid[var.region]}"
        source_type = "image"
    }
    metadata = {
        ssh_authorized_keys = "${var.ssh_public_key}"
    }
}
次に変数を代入するcompute-var.tfファイルを作成していきます。
variable "NumInstances"{
  default = "1"
}
variable "instance_shape" {
  default = "VM.Standard2.1"
}
variable "instance_display_name" {
  default = "WebInstance"
}
variable "instance_image_ocid" {
  type = "map"
  default = {
    ap-tokyo-1 = "ocid1.image.oc1.ap-tokyo-1.aaaaaaaattpocc2scb7ece7xwpadvo4c5e7iuyg7p3mhbm554uurcgnwh5cq"
  }
}
variable "ssh_public_key" {
  default = "XXXX"
}
以上でファイル作成は終了です。
では実際に構築してみます。
8.terraform起動
terraformを起動させて、下記コマンドを入力してみます。
terraform plan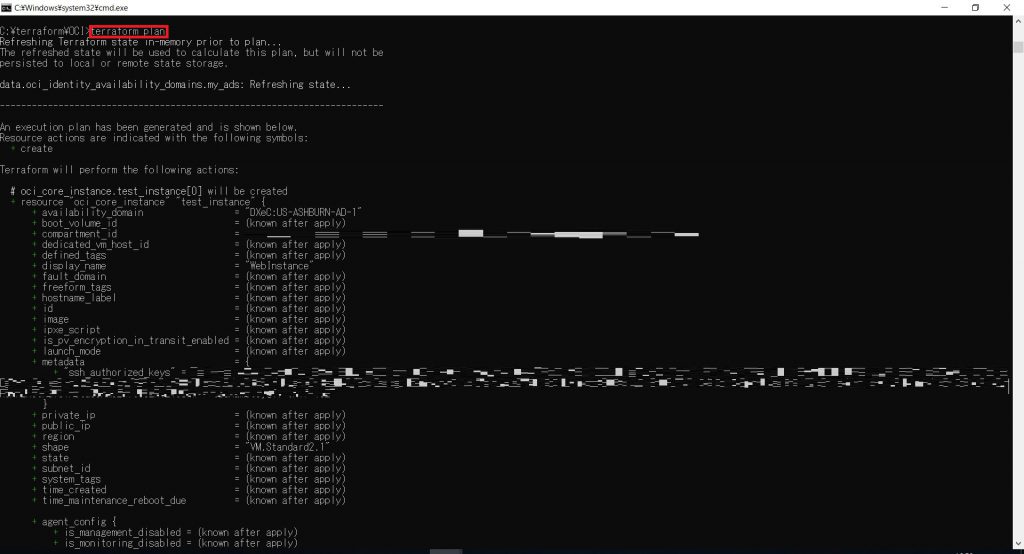
構築されるリソースが表示されます。次は実際にOCIへapplyしてみます。
terraform apply 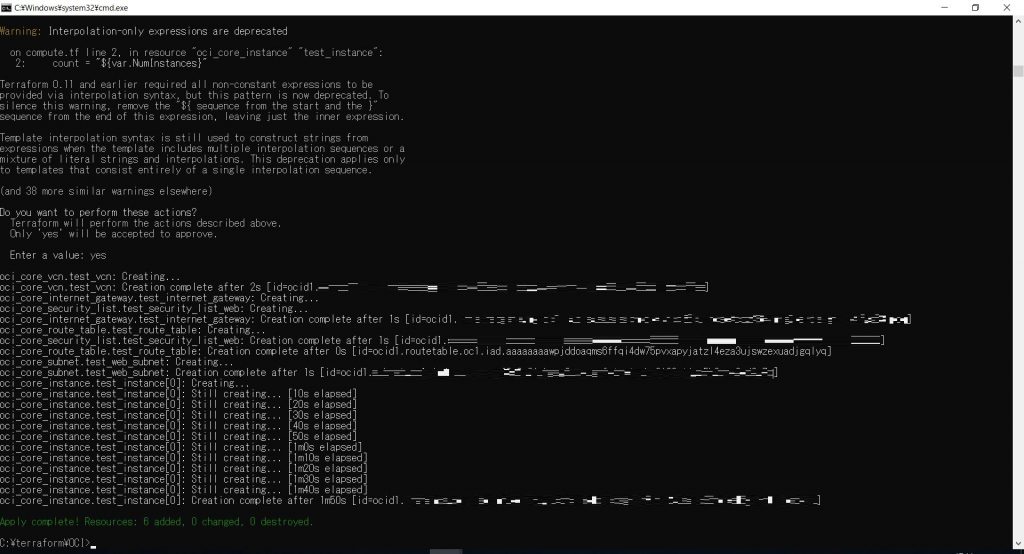
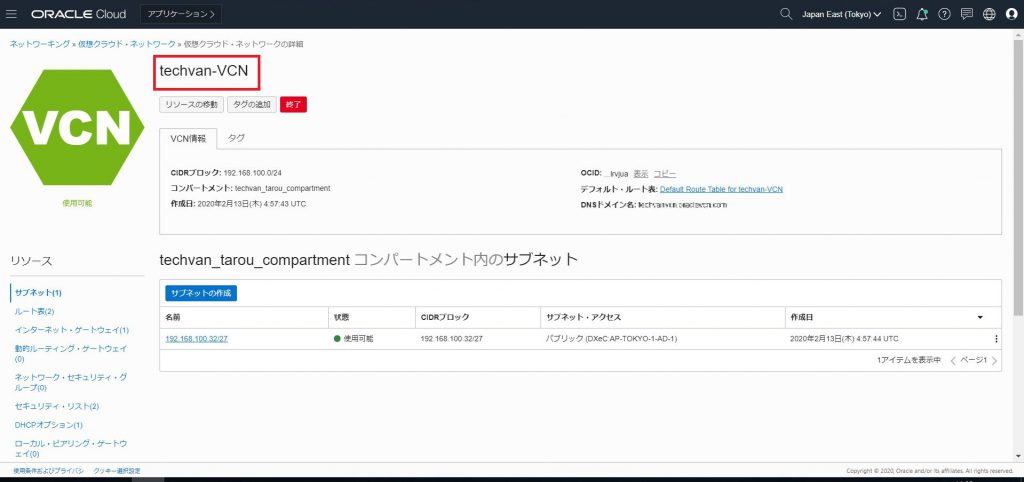
コマンドを実行し、completeと表示されますので、構築できているかコンソールにログインして確認してみます。
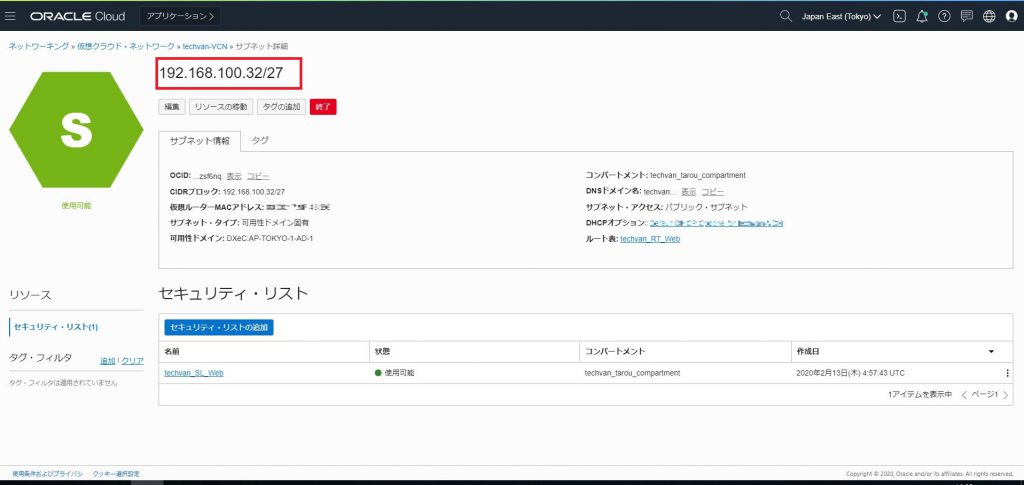
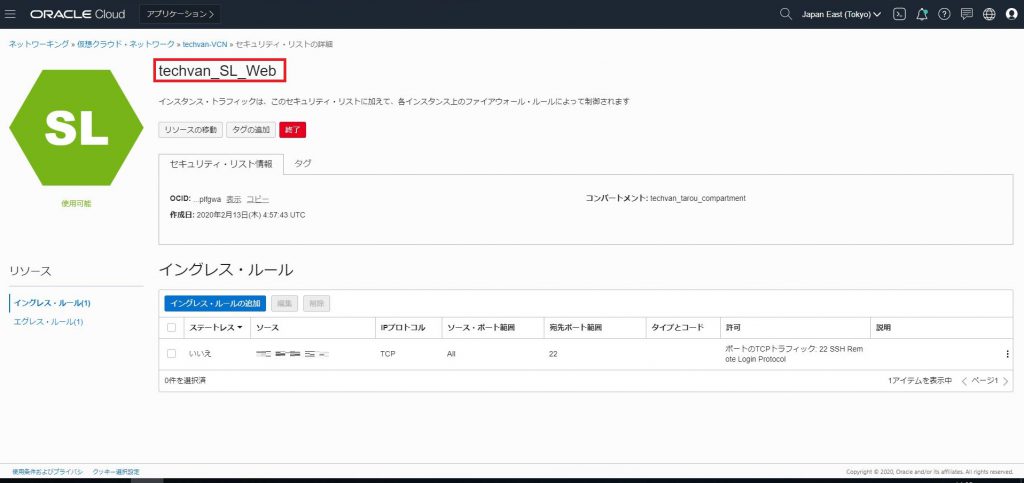
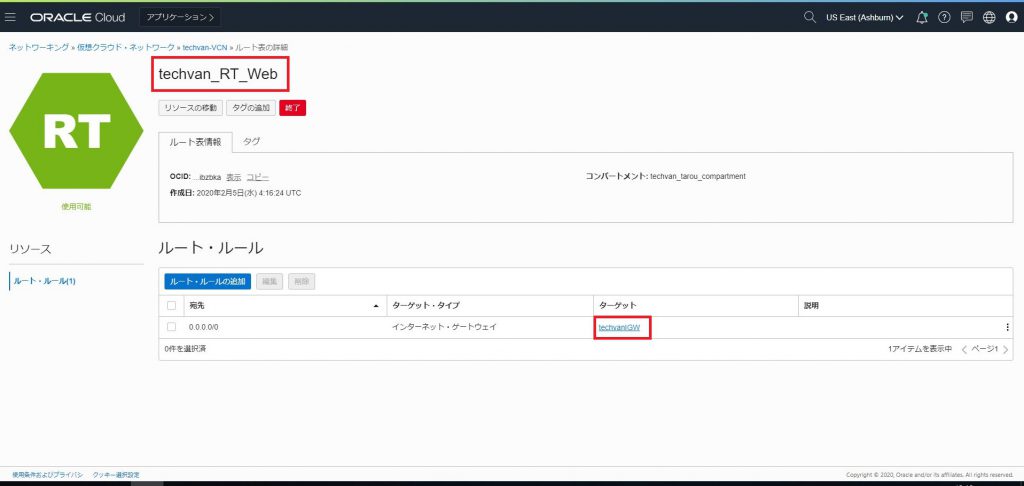
以下は各リソースのキャプチャです。
VCN
サブネット
セキュリティグループ
IGWとルートテーブル
インスタンス
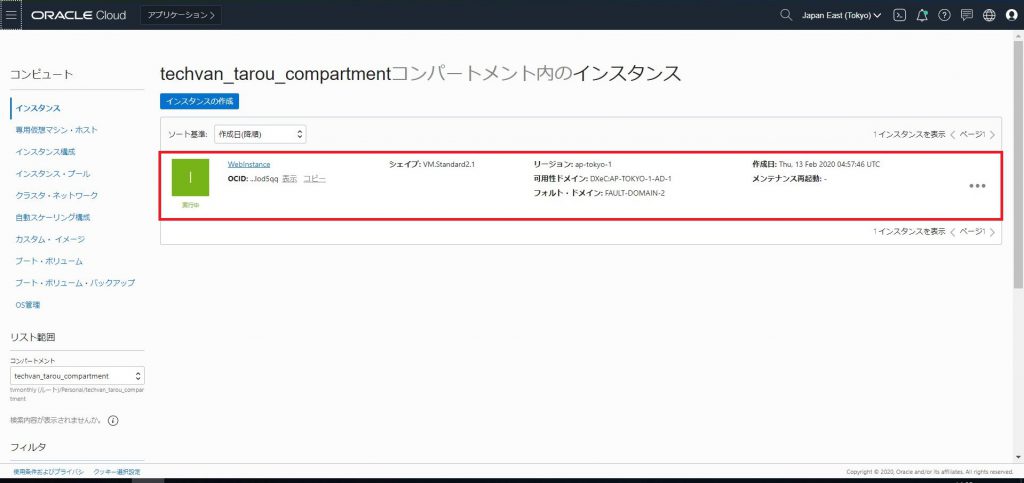
構築できていました。最後に作成されたcomputeにログインできるか確認して終了です。
今後OCIのcomputeを使って何か検証したいときにterraformを使えば OCIコンソールにログインせずにリソースを構築できるようになりました。
変数ファイルを少し書き換えれば他のコンパートメントに同じリソースを構築できます。
OCIを利用したことがない人にもファイルを渡せば、OCIコンソールへログインせずに間違いなく構築できるので便利ですね。